Most people think van life is all about freedom, open roads, and sunrise views. But if you’ve ever spent a night in a van when it’s 10°F outside-or 95°F with the sun beating down-you know the real challenge isn’t finding a place to park. It’s staying comfortable inside. Without proper insulation, your van turns into a sauna in summer and an icebox in winter. The good news? You don’t need to spend thousands or hire a pro to fix it. With the right materials and a little elbow grease, you can turn any van into a year-round home.
Why Van Insulation Isn’t Optional
Van walls are thin. Metal conducts heat like crazy. In winter, the cold from outside seeps right through, making your heater work overtime. In summer, the sun bakes the metal roof and walls, turning your van into a portable oven. Without insulation, condensation builds up on the inside, leading to mold, rust, and that damp, musty smell no air freshener can fix.
Real van lifers who skip insulation often end up buying space heaters, portable AC units, or even sleeping in their cars just to avoid the discomfort. That’s not freedom-that’s survival. Proper insulation doesn’t just make life easier. It saves money on energy, protects your van’s structure, and makes sleeping comfortable without layers of blankets or a fan running all night.
How Insulation Works in a Van
Insulation doesn’t stop heat-it slows it down. Heat moves in three ways: conduction (through solid materials), convection (through air), and radiation (from hot surfaces). Van insulation tackles all three.
Think of it like a thermos. The metal walls of your van are the outside of the thermos. The insulation is the vacuum seal inside. It traps air, blocks heat transfer, and keeps the temperature stable. The key is using materials that resist heat flow and create air gaps. That’s why foam boards, reflective barriers, and spray foam work better than just adding blankets.
Top 5 Insulation Materials for Vans (2025)
Not all insulation is created equal. Some are easy to install. Others are expensive. Some work better in cold climates. Here’s what works best right now:
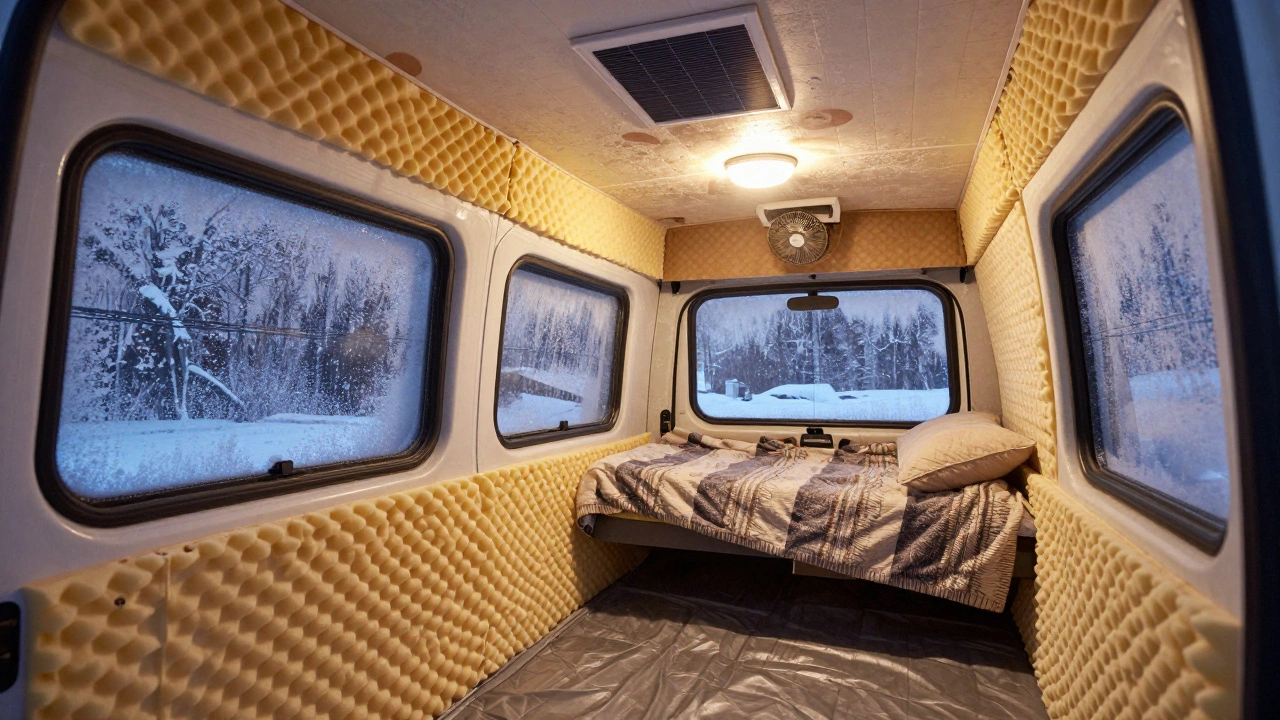
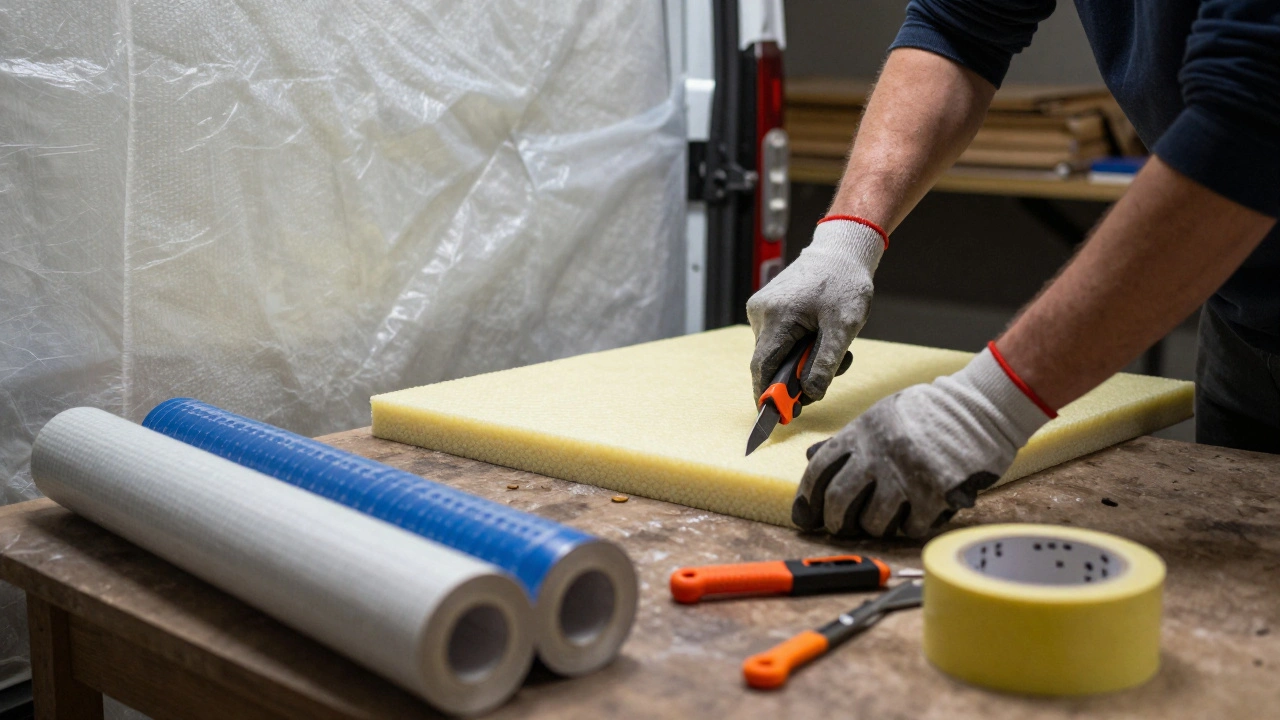
- Reflective insulation (like Reflectix) - A thin, bubble-wrap-like material with aluminum on both sides. It reflects radiant heat, which is huge in summer. Easy to cut and install with staples. Best for walls and ceilings. Doesn’t stop conduction, so pair it with something thicker.
- Polyisocyanurate foam board (R-6 per inch) - Rigid, dense, and high-performing. It’s the go-to for serious van builders. Holds up under pressure, resists moisture, and has the best R-value per inch. You’ll need to cut it precisely, but it’s worth it. Used by over 70% of DIY van conversions in 2025, according to VanLifeInsider’s annual survey.
- Closed-cell spray foam - Expensive but incredibly effective. It fills every gap, seals air leaks, and adds structural strength. It’s the best for irregular spaces like wheel wells. But it’s messy, requires a sprayer, and you can’t DIY it without proper gear. Best left to pros or those with experience.
- Neoprene foam - Soft, flexible, and great for curved surfaces. Used mostly under flooring or behind trim. It’s not great for walls alone, but it’s perfect as a secondary layer. Also blocks sound, which is a nice bonus.
- Mineral wool (Rockwool) - Fire-resistant, mold-proof, and handles moisture well. It’s heavy, so it’s not ideal for roofs unless you’re reinforcing the structure. But for walls and floors in cold climates, it’s unbeatable. Used by many winter van lifers in Alaska and the Rockies.
Where to Insulate (and Where Not To)
Insulating your whole van sounds great, but not every surface needs it. Here’s what to focus on:
- Do insulate: Walls, ceiling, floor, and wheel wells. These are the main heat transfer points. The ceiling loses the most heat-up to 40%-so don’t skimp there.
- Don’t insulate: The engine compartment, exhaust pipes, or anything that needs to breathe. Insulating these can cause overheating or trap dangerous fumes.
- Optional but smart: The front cab area. If you sleep in the front, insulate behind the seats and under the dashboard. It’s often ignored, but it’s a major cold spot.
Also, never skip sealing gaps. Even the best insulation fails if air leaks through around windows, doors, or vents. Use butyl tape or foam sealant on all edges. A $10 roll of butyl tape can save you hundreds in heating bills.

Real-World Results: Before and After
A van owner in Minnesota insulated their 2018 Ford Transit with 1.5 inches of polyisocyanurate foam board, Reflectix on the ceiling, and neoprene under the floor. Before: it took 45 minutes to warm up the van with a 1,500-watt heater. After: 12 minutes. The temperature stayed stable overnight even when it hit -15°F outside. No condensation. No mold. No constant fan noise.
Another builder in Arizona used Reflectix and 1-inch foam board. In July, when the outside hit 108°F, the inside stayed at 82°F without AC. They ran a small solar-powered fan for airflow and called it good.
These aren’t magic tricks. They’re the result of choosing the right materials and installing them correctly.
Common Mistakes to Avoid
Even experienced builders mess up. Here are the top five mistakes:
- Skipping vapor barriers - Moisture gets trapped between insulation and metal, causing rust. Always use a vapor barrier like polyethylene sheeting on the warm side of insulation (inside the van).
- Using fiberglass - It’s cheap, but it’s terrible for vans. It absorbs moisture, sheds fibers, and loses R-value when compressed. You’ll regret it.
- Insulating only the walls - The floor and ceiling matter just as much. A cold floor makes you feel 10 degrees colder than you are.
- Not sealing gaps - One tiny crack can undo all your work. Use a flashlight at night to spot light leaks. Seal them.
- Buying cheap insulation - If it’s too thin, too soft, or too cheap, it won’t last. R-value matters. Don’t go below R-4 per inch for walls.
How Much Does It Cost?
You can insulate a small van for under $300 if you do it yourself. Here’s a realistic breakdown for a 14-foot van:
- 1.5-inch polyisocyanurate foam board: $120
- Reflectix (100 sq ft): $45
- Neoprene underfloor: $50
- Butyl tape and sealant: $30
- Staples, utility knife, gloves: $25
- Optional: Vapor barrier (poly sheeting): $30
Total: $300. That’s less than a cheap portable heater. And it lasts 10+ years.
Professional installation? Expect $1,500-$3,000. Unless you’re building a luxury rig, DIY is the smarter move.
Insulation and Ventilation Go Together
Insulation traps heat-but it also traps moisture. That’s why ventilation is just as important. You need airflow to dry out condensation.
Install at least two vents: one high (exhaust) and one low (intake). A roof vent with a fan, like the MaxxAir Deluxe, works wonders. Run it for 10 minutes after cooking or showering. Open a window slightly when weather allows. Even a small crack helps.
Don’t rely on your AC or heater to fix humidity. They’re not dehumidifiers. Only airflow does that.
What About Solar Panels and Power?
Insulation reduces your power needs. A well-insulated van might only need 100-200 watts of solar to run a small heater or fan. Without insulation, you might need 500+ watts just to stay warm. That means bigger batteries, more panels, and higher costs.
Insulation is the first step to a low-power van life. It’s the foundation. Everything else-solar, batteries, heaters-builds on it.
Final Thoughts: It’s Not About Comfort. It’s About Control.
Van life is supposed to be about living on your terms. But if your van is too hot or too cold, you’re not in control-you’re reacting. Insulation gives you back that control. It means you can choose where to park, when to travel, and how to live-without being at the mercy of the weather.
It’s not glamorous. It’s not Instagram-worthy. But it’s the quiet, practical thing that turns a van into a home. Do it right, and you’ll thank yourself every single winter night-and every scorching summer morning.
What’s the best insulation for cold climates?
For cold climates, use 1.5 to 2 inches of polyisocyanurate foam board combined with mineral wool in the walls and floor. Add Reflectix on the ceiling to reflect radiant heat back inside. Seal all gaps with butyl tape. This setup can keep a van above freezing even when it’s -20°F outside.
Can I use household insulation like fiberglass in my van?
No. Fiberglass absorbs moisture, sheds tiny glass fibers into the air, and loses its insulating power when compressed. It’s designed for attics, not moving vehicles. In a van, it leads to mold, rust, and health risks. Stick to materials made for RVs and vans.
Do I need a vapor barrier?
Yes. Without a vapor barrier, moisture from breathing, cooking, or showering gets trapped between the insulation and metal walls. This causes condensation, which leads to rust and mold. Use a 6-mil polyethylene sheet on the warm side of the insulation-right under your paneling.
How do I insulate around windows and doors?
Use foam tape or butyl tape to seal gaps around window frames and door edges. Then, install insulated curtains or thermal shades at night. These can reduce heat loss by up to 40%. Avoid rigid foam on windows-it blocks light and is hard to install. Focus on sealing, not covering.
How long does van insulation last?
High-quality materials like polyisocyanurate foam board and mineral wool last 10-15 years with no degradation. Spray foam lasts even longer. The only thing that wears out is sealant around doors and windows-check it every year and reseal if you see cracks or peeling.
If you’re planning to live in your van year-round, insulation isn’t an upgrade-it’s a necessity. Start with the ceiling, seal the gaps, and don’t cut corners. Your future self will thank you when the snow falls and the sun blazes.


Paul Timms
December 5, 2025 AT 05:42Proper insulation is non-negotiable for year-round van life. The difference between a 12-minute heat-up and a 45-minute one isn’t just convenience-it’s safety and longevity of your build.
Honey Jonson
December 6, 2025 AT 00:15omg yes i did the reflectix + foam board thing last winter and my van didnt turn into a freezer lol i thought i was gonna die but now i just wear socks inside and its fine 😌
Nathaniel Petrovick
December 6, 2025 AT 04:54man i did this exact setup last spring and it changed everything. i used the polyiso on the walls, neoprene under the floor, and sealed every gap with butyl tape. no more condensation, no more frost on the windows. total cost was $280. best $280 i ever spent.
Elmer Burgos
December 7, 2025 AT 07:14really appreciate how you broke down the materials and where to use them. i was debating between spray foam and foam board and this helped me pick the right path. thanks for keeping it real and not pushing the expensive stuff
Sally McElroy
December 7, 2025 AT 11:59It’s alarming how many people still think fiberglass is acceptable in a van. It’s not just ineffective-it’s a health hazard. And yet, YouTube tutorials still promote it. People are literally risking their lungs for a $50 shortcut. This is why we can’t have nice things.
Cait Sporleder
December 8, 2025 AT 19:19One cannot overstate the thermodynamic elegance of a properly insulated van. The interplay between radiant heat reflection, convective air trapping, and conductive resistance creates a microclimate that is not merely comfortable-it is bio-resilient. The polyisocyanurate foam board, with its R-6 per inch, functions as a thermal diode, permitting minimal entropy transfer while maintaining interior equilibrium. When paired with a vapor barrier, one doesn’t merely insulate-they orchestrate a physiological sanctuary against the capriciousness of external climatic chaos. One might even say it is the quiet rebellion of autonomy against the tyranny of temperature.
Destiny Brumbaugh
December 9, 2025 AT 12:44why do americans always overcomplicate this i lived in a van in alaska for 3 years used old carpet and bubble wrap and never had a problem. you dont need fancy foam board just use what you got. america thinks everything needs to be bought and branded
Jeroen Post
December 10, 2025 AT 22:36they dont want you to know the real truth the government and insulation companies are in cahoots to keep you dependent on expensive materials the real solution is grounding your van to the earth and using copper wire to redirect thermal energy dont tell them i told you
Sara Escanciano
December 11, 2025 AT 01:56After reading this, I’m ashamed of anyone who skips the vapor barrier. You’re not just being cheap-you’re inviting mold into your personal space, and that’s a violation of basic self-respect. If you can’t seal your own walls, you don’t deserve to live in a van.